Period. With iOS, you have two simple options: use iCloud or use iTunes. This article explains how to back up using iCloud. Cloud is Apple's own cloud-based storage and backup solution for Apple software. It comes included with your device, and it's free for up to 5GB. I'll explain in more detail below how you can use that space. You should be able to move through the following instructions for backing up using iCloud in about five minutes.
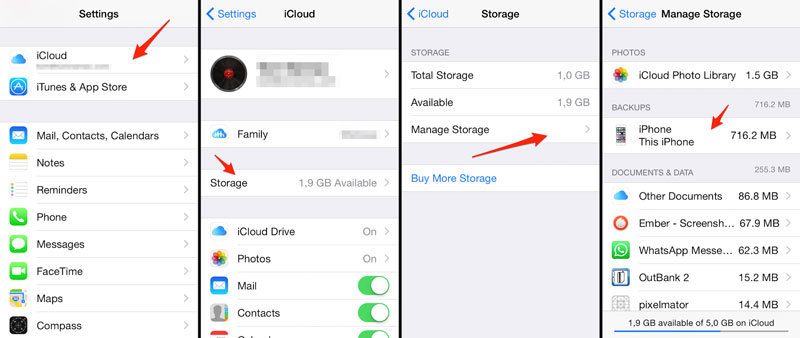
2. Under Backup, turn on the switch for iCloud Backup. 3. Go back one screen and turn on or off the data you want backed up from the selections. Notice that not all your apps appear here, only the pre-installed Apple apps. At this stage, you can consider yourself finished with the backup if don't want to back up anything else on your phone. If you're finished, skip ahead to step 9. If you do want to back up more of your non-Apple apps, continue through the rest of the steps.
4. Scroll all the way down to Storage & Backup, and tap it. 5. Choose the third choice shown, Manage Storage. On this page, you'll see a list of only Apple apps and data that are backed up. 6. …look at the top, under the heading "Backups," and select the device you want to manage.
After tapping on your device, the next page may take a moment or two to load. 7. You should now be on a page called Info. Under the heading Backup Options, you'll see a list of the top five storage-using apps, plus another button reading "Show All Apps." Press Show All Apps, and you can now choose which items you want to back up. You should back up apps that contain important information or files, as well as apps that you have taken a lot of time to customize.
I personally wouldn't back up most apps that use a cloud service because all the app data you care about is already being hosted by the provider—not locally on your phone. 8. As you decide which apps you don't want to back up, toggle those to "off." A red button reading "Turn Off & Delete" will appear.
If you click it, you'll still have the app and its data locally on your iPhone. All you're "deleting" is the data from iCloud's backup. At the bottom of the screen, you'll see how much space you have available. Apple gives you 5GB of iCloud storage free. 9. Connect your iPhone or iPad to a Wi-Fi signal, plug it into a power source (like an outlet), and leave the screen locked (in other words, don't use the device). Your iPhone or iPad will automatically backup once a day when it meets these three conditions.
1. When launching a new (or newly wiped) iOS device, a Setup Assistant will automatically ask if you want to "Restore from iCloud Backup." Choose this option to restore your old iPhone's or iPad's data, apps, and settings. 2. Enter your iCloud username and password. 3. You'll see the three most recent backups to choose from.
In most cases, you'll want the latest one. 4. From this point, the iPhone or iPad will pretty much do the rest. Enter passwords when prompted, and don't mess with your phone while that progress bar is still doing its thing. Cloud will restore your apps to the version you had rather than the most up-to-date version, unless the previously stored version is no longer available, in which case it defaults to the most recent. TV shows purchased through iTunes (U.S.
Apps, books, music, and TV shows that have been subsequently removed from the App Store, iTunes Store, and iBookstore since you downloaded or purchased them. If you don't have a lot of time to learn much more about backing up, consider backing up only the files that are most important to you, such as photos or work files. To do a very quick backup job with your PC or Mac, see Get Organized: Backup Your Most Important Data.


0 Comments